Best Strategy to Work With Multiple Customers on Jira
Hey there, my fellow super-coder!
Feeling overwhelmed handling a gazillion tasks from a gazillion customers?
Don’t worry, we’ve got you covered. In this guide, we’ll explore a strategy to handle multiple Jira accounts
(one for each client) in one single flow. No more messing with complicated steps or paying for extra seats
on your plan. We’ll also integrate everything into an automation tool so that each
morning, you wake up to a perfect, organized and succint summary of all your tasks – sorted by difficulty and priority.
Let’s jump right in!
Be advised, while the code on this page is functional and tested, it is advisable to be at least familiar with PHP before implementing such a solution.
Configure a Jira Account for Each Customer
The best part of using Jira is that you can create individual accounts for each customer. Why is that useful?
- You can stay on Jira’s free plan, as each customer’s team will manage their own space.
- It keeps your different customers and their tasks nicely siloed from each other.
- You don’t need to share all your customer details with your entire dev team – only the relevant customer’s Jira!
In short, every customer manages their own environment, and you, the developer, are just a user on their account. Nice and neat!
Getting Your Jira Credentials & Setting Up a Fresh Account
Ready to connect to Jira via API? Here’s your step-by-step checklist for each customer:
- Sign Up/In: Head over to Atlassian Sign Up or ask your customer to add you as a user if the account is already set up.
-
Find Your Jira Domain:
Usually it looks like
yourprojectname.atlassian.net. - Create an API Token: In Jira, go to Profile Icon > Account Settings > Security > Create and manage API tokens. Generate a token, copy it, and store it somewhere safe.
- Note Your API Email & Key Name: Your login email is the one associated with your Atlassian account. Key name can be anything you want, but keep it consistent if you’re dealing with multiple accounts.
-
Obtain Your Board ID:
In Jira, go to your project board. Check the URL for something like
rapidView=1; that number is typically your board ID. - Invite Yourself as an Administrator: If you created the account for your customer, add your own email in the Users/Access section, so you can manage tasks freely.
Name Each Board & Standardize Task Stages
If you’re doing web-related magic, name each board with the customer’s domain name. It keeps it super obvious who’s who. Also, each board should have four major stages:
- Planning: Preliminary tasks and discussions.
- To Do: The tasks agreed upon and ready to be tackled.
- To Check: Completed tasks awaiting the customer’s review.
- Done: Tasks the customer has fully approved (or flagged to go back to “To Do”).
This flow works wonders for clarity: you know what’s pending, what’s done, and what needs checking at any given time. Easy peasy.
One Script to Rule Them All
Rather than letting an automation flow connect directly to every single Jira account, you can create a simple PHP script that:
- Holds all your customers’ Jira credentials securely (in a non-database file).
- Pulls all pending tasks from every Jira account you manage in one go.
- Is protected with an API key, so only you (or your authorized Flow) can access it.
This approach keeps credentials hidden from your team or third-party freelancers. It also cuts down on the number of modules (and therefore cost) in your automation flow. Fewer modules = fewer run charges. Win-win!
The PHP Script Step-by-Step
Below is the complete and functional PHP script. We’ll break it into chunks and then show you the full code at the end.
Snippet 1: API Key & Security Checks
<?php

// Define the valid API key
define('API_KEY', '__put_some_random_string_here__');

// Get the Authorization header
$headers = getallheaders();
$apiKey = $headers['Authorization'] ?? '';

// Remove "Bearer " prefix if it exists
$apiKey = str_replace('Bearer ', '', $apiKey);

// Check if the API key is valid
if ($apiKey !== API_KEY) {
    http_response_code(403); // Forbidden
    echo json_encode(["error" => "Invalid API key"]);
    exit;
}

// At this point, we know the request is authorized
In this snippet, we define an API_KEY constant that must match the
Authorization header sent by the automation flow. If it doesn’t match,
we return a 403 Forbidden response and exit.
That way, no one but you can read your Jira tasks.
Be sure you set a unique and really long and random string as your API key.
Snippet 2: Storing Jira Credentials
// Prepare a global config array for your Jira accounts
$gc = array();
$gc['api_keys'] = array();

// Example of storing credentials for multiple domains
$gc['api_keys']['domain_name1'] = array(
    'jira-domain' => 'projectname1.atlassian.net',
    'key-name' => 'your-key',
    'api-key' => 'ATAT..........',
    'api-email' => '[email protected]',
    'board-id' => '1',
    'jql' => 'ORDER BY updated DESC'
);

$gc['api_keys']['domain_name2'] = array(
    'jira-domain' => 'projectname2.atlassian.net',
    'key-name' => 'your-key',
    'api-key' => 'ATAT..........',
    'api-email' => '[email protected]',
    'board-id' => '1',
    'jql' => 'ORDER BY updated DESC'
);

// ...etc.
Each entry in the $gc['api_keys'] array corresponds to a separate customer’s Jira domain.
We define the domain, the api-key, the api-email (which is your Atlassian/Jira login for that account),
and the board-id.
You can add as many domains as you need in this array.
Snippet 3: Function to Fetch Jira Tasks
function get_jira_tasks($account){
    global $gc;
    $api = $gc['api_keys'][$account];

    // Jira credentials
    $jira_email = $api['api-email'];
    $jira_domain = $api['jira-domain'];
    $jira_board_id = $api['board-id'];
    $api_token = $api['api-key'];
    $jql = urlencode($api['jql']);

    // Jira API URL for search
    $jira_api_url = "https://{$jira_domain}/rest/api/3/search";

    // Set up the cURL request
    $ch = curl_init();
    curl_setopt($ch, CURLOPT_URL, $jira_api_url . "?jql={$jql}&maxResults=10");
    curl_setopt($ch, CURLOPT_RETURNTRANSFER, true);
    curl_setopt($ch, CURLOPT_USERPWD, "{$jira_email}:{$api_token}");
    curl_setopt($ch, CURLOPT_HTTPHEADER, [
        "Accept: application/json",
    ]);

    // Execute cURL request and get response
    $response = curl_exec($ch);

    // Check for errors
    if (curl_errno($ch)) {
        echo 'cURL error: ' . curl_error($ch);
        exit;
    }

    // Close cURL connection
    curl_close($ch);

    // Decode the JSON response
    $tasks = json_decode($response, true);

    return $tasks;
}
This function uses cURL to make a GET request to each Jira domain’s
search endpoint. The jql defines how we retrieve tasks.
For now, we just fetch the most recently updated tasks with ORDER BY updated DESC.
Feel free to customize your JQL to suit your needs (like tasks assigned to you, tasks in “To Do”, etc.).
Snippet 4: Collect & JSON-Encode the Result
// Set header for JSON response
header('Content-Type: application/json; charset=utf-8');

// Prepare final output array
$output = array();

// Loop over each configured Jira account
foreach ($gc['api_keys'] as $account => $api) {
    $tasks = get_jira_tasks($account);

    $issuesArray = array();
    if (isset($tasks['issues']) && count($tasks['issues']) > 0) {
        foreach ($tasks['issues'] as $issue) {
            $issuesArray[] = array(
                'key'     => $issue['key'],
                'status'  => $issue['fields']['status']['name'],
                'summary' => $issue['fields']['summary'],
                'link'    => "https://{$api['jira-domain']}/browse/{$issue['key']}"
            );
        }
    }

    // Add the account-level data to the output
    $output[] = array(
        'account'     => $account,
        'owner_email' => $api['api-email'],
        'jira_domain' => $api['jira-domain'],
        'tasks'       => $issuesArray
    );
}

// Output everything as JSON
echo json_encode($output, JSON_PRETTY_PRINT);
We loop through each account, fetch tasks, then build an array with
key (the Jira issue ID), status, summary, and a
direct link to the task. Finally, we return the combined tasks
in a JSON array for all accounts.
Complete PHP Script
Here’s the entire script consolidated (just copy & paste into your server file):
Full Code Snippet
<?php


// Define the valid API key
define('API_KEY', '__put_some_random_string_here__');


// Get the Authorization header
$headers = getallheaders();
$apiKey = $headers['Authorization'] ?? '';

// Remove "Bearer " prefix if it exists
$apiKey = str_replace('Bearer ', '', $apiKey);

// Check if the API key is valid
if ($apiKey !== API_KEY) {
    http_response_code(403); // Forbidden
    echo json_encode(["error" => "Invalid API key"]);
    exit;
}


$gc = array();

$gc['api_keys'] = array();


//profile icon > account settings > Security (top bar) > API tokens

$gc['api_keys']['domain_name1'] = array(
    'jira-domain' => 'projectname1.atlassian.net',
    'key-name' => 'your-key',
    'api-key' => 'ATAT..........',
    'api-email' => '[email protected]',
    'board-id' => '1',
    'jql' => 'ORDER BY updated DESC'
);

$gc['api_keys']['domain_name2'] = array(
    'jira-domain' => 'projectname2.atlassian.net',
    'key-name' => 'your-key',
    'api-key' => 'ATAT..........',
    'api-email' => '[email protected]',
    'board-id' => '1',
    'jql' => 'ORDER BY updated DESC'
);

$gc['api_keys']['domain_name3'] = array(
    'jira-domain' => 'projectname3.atlassian.net',
    'key-name' => 'your-key',
    'api-key' => 'ATAT..........',
    'api-email' => '[email protected]',
    'board-id' => '1',
    'jql' => 'ORDER BY updated DESC'
);

function get_jira_tasks($account){

    global $gc;

    $api = $gc['api_keys'][$account];

    // Jira credentials
    $jira_email = $api['api-email'];
    $jira_domain = $api['jira-domain'];
    $jira_board_id = $api['board-id'];
    $api_token = $api['api-key'];
    $jql = urlencode($api['jql']);

    // Jira API URL for search
    $jira_api_url = "https://{$jira_domain}/rest/api/3/search";

    // Set up the cURL request
    $ch = curl_init();
    curl_setopt($ch, CURLOPT_URL, $jira_api_url . "?jql={$jql}&maxResults=10");
    curl_setopt($ch, CURLOPT_RETURNTRANSFER, true);
    curl_setopt($ch, CURLOPT_USERPWD, "{$jira_email}:{$api_token}");
    curl_setopt($ch, CURLOPT_HTTPHEADER, [
        "Accept: application/json",
    ]);

    // Execute cURL request and get response
    $response = curl_exec($ch);

    // Check for errors
    if (curl_errno($ch)) {
        echo 'cURL error: ' . curl_error($ch);
        exit;
    }

    // Close cURL connection
    curl_close($ch);

    // Decode the JSON response
    $tasks = json_decode($response, true);

    return $tasks;
}


// --- Generate JSON Output ---
header('Content-Type: application/json; charset=utf-8');

// This array will hold the final structured data for all domains
$output = array();

foreach ($gc['api_keys'] as $account => $api) {
    $tasks = get_jira_tasks($account);

    $issuesArray = array();
    if (isset($tasks['issues']) && count($tasks['issues']) > 0) {
        foreach ($tasks['issues'] as $issue) {
            // Build a structured representation of each task
            $issuesArray[] = array(
                'key'     => $issue['key'],
                'status'  => $issue['fields']['status']['name'],
                'summary' => $issue['fields']['summary'],
                'link'    => "https://{$api['jira-domain']}/browse/{$issue['key']}"
            );
        }
    }

    // Add the account-level data and the tasks to the output
    $output[] = array(
        'account'     => $account,
        'owner_email' => $api['api-email'],
        'jira_domain' => $api['jira-domain'],
        'tasks'       => $issuesArray
    );
}

// Echo the JSON-encoded structure
echo json_encode($output, JSON_PRETTY_PRINT);

?>
Integrating With an Automation Workflow
Next, we need to create an Automation Flow. We will use our “Lumnar Flow” in this example, but the logic is the same for whatever other automation service you decide to use. You could probably do it equally clean in Zapier, or Make.com, its your choise what you prefer.
This Flow will have the following steps:
- HTTP Request: Makes an authenticated request (with “Bearer <API_KEY>”) to our new PHP script.
- Retrieves JSON: Our script sends back all pending tasks from all Jira domains.
- Processes Data: We can then pass that JSON to a "data" module, then use a "text" module to prepare it for the final “ChatGPT” module that will analyze tasks for priority and sumarize them. Like this, we get a better overview of what the overall load for that day is, instead of getting lost in an other endless list of tasks.
- Telegram Bot Notification: Finally, we send the output to your Telegram group or channel for daily updates.
Here is an workflow example of a flow done with the Jira integration module, in Lumnar Flow, that does exactly what this tutorial achieves, but using the module instead of the script. I decided to show this one, so that you can compare how much more efficient the script version is, but also to have it as example if you decide to go for the module way.
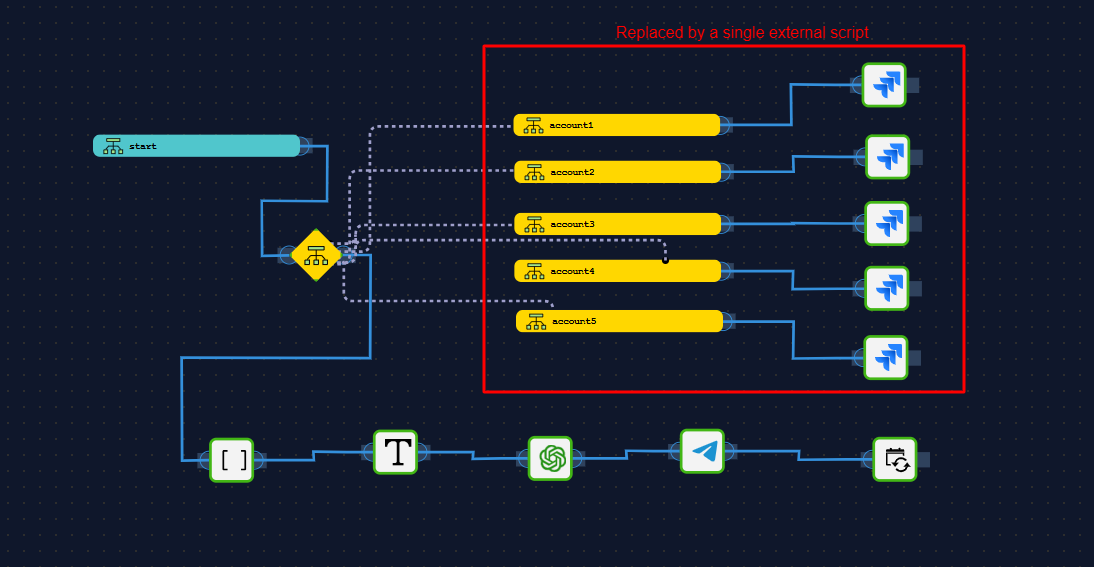
In summary, the workflow will look like this: start -> HTTP Request -> Data (using json source from http_request response) -> Text (using array to template from data) -> ChatGPT (prompted to analyze the data) -> Telegram Bot Notification (or email module if you prefer).
Experiment with the prompt. A good starting example would be something like: “Analyze the tasks and summarize them by priority and difficulty, highligting the tasks that you consider more complex. Be succint.”. Of course prompts can get very complex, and even include multiple steps, attempting to suggest possible solutions to the current tasks. However, trying to do too much in one go usually results in less flexible tools that will start to annoy you over time. Its best if you can create individual tools that will solve just clear and specific tasks, when needed, avoiding a general solution that does everything. Trust me on this.
This means every morning, you’ll get a Telegram/email message with a summarized, prioritized list of
everything that’s waiting for you.
(Now your coffee tastes even better!)
Tutorial: Creating & Setting Up Your Telegram Bot
-
Find “BotFather” in Telegram:
Open Telegram, search for
@BotFather, and start a chat. -
Create New Bot:
Send
/newbotto BotFather. You’ll be asked for a name and a username (e.g. myProjectBot). -
Receive API Token:
BotFather will then send you a
tokenthat looks like123456:ABC-123def. Save that token for your Lumnar Flow’s Telegram Module. - Add Your Bot to a Group (Optional): Create a group, invite the bot. Usually, you also need to make it an admin if you want it to see messages. But for sending notifications, normal membership is enough.
-
Get the Chat ID:
The easiest way is to message
@RawDataBotor similar. When you send a message, it will show the chat ID in the response. Alternatively, you can use the Telegram APIgetUpdatesmethod with your bot token to see the chat IDs.
Schedule the Flow for Your Workday Start
Last step: add a Delay or Schedule module in Lumnar Flow so that the entire chain of events starts at, say, 8 AM (or whenever your day begins). That way, your phone (or group chat) lights up with a concise task breakdown right when you’re about to start powering through your daily missions.
And there you have it – the perfect system to keep track of multiple customers’ tasks, get them auto-prioritized, and delivered to your fingertips every single morning. No more chaotic toggling through numerous Jira accounts. Let’s get those tasks done!
That's All, Folks!
You’ve now got the blueprint for a streamlined, cost-effective, and super-organized approach to multiple Jira projects. May your to-do lists be short and your done-lists be long!
Written by Max Lumnar
Building custom webs since '98, Max is a full-stack developer, AI enthusiast and founder of Lumnar Creations.